How to Change Bike Brake Pads: A Comprehensive Guide
Worn brake pads can compromise your safety and the performance of your bicycle. Knowing how to change bike brake pads is a crucial skill for any cyclist, from casual riders to seasoned professionals. This guide provides a step-by-step approach to replacing your brake pads, ensuring you can maintain your bike’s stopping power effectively and safely. We’ll cover everything from identifying when it’s time for a change to selecting the right replacement pads and performing the replacement process itself. Regular maintenance, including knowing how to change bike brake pads, extends the life of your bike and keeps you safe on the road or trail.
When to Change Your Bike Brake Pads
Identifying when your brake pads need replacing is essential for safety. Here are a few indicators:
- Thinning Pads: The most obvious sign is the thickness of the brake pad material. Most brake pads have wear indicators or a minimum thickness marked on them. If the pad material is worn down to or below this line, it’s time to change bike brake pads.
- Squealing or Grinding Noises: These noises often indicate that the brake pads are worn down to the metal backing, which is rubbing against the rotor or rim. This can damage the braking surface and requires immediate attention.
- Reduced Braking Performance: If you notice that your brakes aren’t as responsive as they used to be, or if you need to apply more pressure to stop effectively, it’s a sign that the brake pads are worn and need replacing.
- Visual Inspection: Regularly inspect your brake pads for cracks, glazing, or uneven wear. Any of these issues can affect braking performance and necessitate a pad replacement.
Tools and Materials Needed
Before you begin, gather the necessary tools and materials:
- New Brake Pads: Ensure you purchase the correct type of brake pads for your specific brake system (e.g., disc brakes, rim brakes).
- Allen Wrench Set: A set of Allen wrenches is essential for loosening and tightening bolts on the brake caliper.
- Torque Wrench: Using a torque wrench ensures that bolts are tightened to the manufacturer’s specifications, preventing damage.
- Pliers: Pliers can be helpful for removing and installing brake pad retaining clips or pins.
- Brake Cleaner: Use brake cleaner to clean the brake rotors or rims and the new brake pads before installation.
- Clean Rags: Keep clean rags handy to wipe away dirt and grease.
- Gloves: Wearing gloves protects your hands from grease and brake dust.
- Optional: A brake pad spreader tool can be helpful for retracting disc brake pistons.
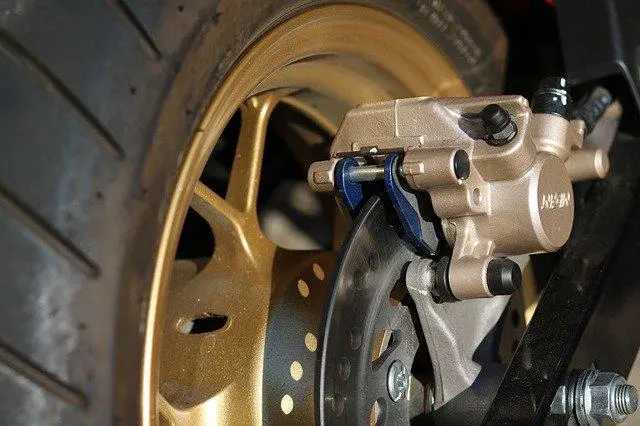
Step-by-Step Guide: Changing Disc Brake Pads
Here’s how to change bike brake pads on a disc brake system:
Step 1: Prepare the Bike
Place your bike in a repair stand or lean it against a stable surface. Ensure the wheel with the brake pads you’re replacing is easily accessible.
Step 2: Remove the Wheel
Loosen the wheel’s quick-release lever or thru-axle and remove the wheel from the frame or fork.
Step 3: Inspect the Caliper
Examine the brake caliper and identify the brake pad retaining bolt, pin, or clip. This will vary depending on the brake system.
Step 4: Remove the Old Brake Pads
Using the appropriate Allen wrench or pliers, remove the retaining bolt, pin, or clip. Once removed, the old brake pads should slide out of the caliper. If they are stuck, gently wiggle them or use pliers to pull them out. Note the orientation of the old pads as you remove them; you’ll need to install the new pads in the same way.
Step 5: Clean the Caliper
Use a clean rag and brake cleaner to clean the brake caliper, removing any dirt, grease, or brake dust. Be careful not to contaminate the brake rotor with cleaner.
Step 6: Retract the Pistons
Disc brake pistons may extend as the brake pads wear down. Before installing the new pads, you’ll need to retract the pistons. You can use a brake pad spreader tool or gently push the pistons back into the caliper using a flat-blade screwdriver or tire lever. Be careful not to damage the pistons or seals.
Step 7: Install the New Brake Pads
Slide the new brake pads into the caliper, ensuring they are oriented correctly. Replace the retaining bolt, pin, or clip and tighten it to the manufacturer’s specified torque using a torque wrench. If you don’t have a torque wrench, tighten it securely but avoid overtightening.
Step 8: Reinstall the Wheel
Reinstall the wheel into the frame or fork and tighten the quick-release lever or thru-axle.
Step 9: Bed-In the New Brake Pads
“Bedding-in” the new brake pads involves performing a series of controlled stops to transfer a layer of brake pad material onto the rotor. This improves braking performance and reduces noise. Find a safe, flat area and ride at a moderate speed. Apply the brakes firmly but not hard enough to lock the wheels. Repeat this process several times, gradually increasing the braking force. Allow the brakes to cool between stops.
Step-by-Step Guide: Changing Rim Brake Pads
Here’s how to change bike brake pads on a rim brake system:
Step 1: Prepare the Bike
Place your bike in a repair stand or lean it against a stable surface. Ensure the wheel with the brake pads you’re replacing is easily accessible.
Step 2: Loosen the Brake Cable
Loosen the brake cable at the brake caliper by releasing the quick-release mechanism or loosening the cable anchor bolt. This will allow you to open the brake arms and access the brake pads.
Step 3: Remove the Old Brake Pads
Rim brake pads are typically held in place by a bolt or nut. Use the appropriate wrench to loosen and remove the bolt or nut. Slide the old brake pads out of the brake shoes.
Step 4: Clean the Brake Shoes
Clean the brake shoes with a clean rag and brake cleaner to remove any dirt or debris.
Step 5: Install the New Brake Pads
Slide the new brake pads into the brake shoes, ensuring they are oriented correctly. The arrow or marking on the brake pad should point in the direction of wheel rotation. Align the brake pads with the braking surface on the rim. The brake pads should contact the rim squarely and not rub against the tire. Tighten the bolt or nut to secure the brake pads in place.
Step 6: Adjust the Brake Cable
Adjust the brake cable tension so that the brake pads are close to the rim but not rubbing. Tighten the cable anchor bolt or re-engage the quick-release mechanism.
Step 7: Test the Brakes
Spin the wheel and apply the brakes to ensure they are working properly. Make any necessary adjustments to the brake cable tension or brake pad alignment. [See also: Adjusting Bike Brakes]
Choosing the Right Brake Pads
Selecting the correct brake pads is crucial for optimal braking performance and safety. Consider the following factors:
- Brake Type: Ensure you choose brake pads that are compatible with your brake system (disc or rim).
- Material: Brake pads are typically made from organic, semi-metallic, or sintered materials. Organic pads are quieter but wear out faster. Semi-metallic pads offer a good balance of performance and durability. Sintered pads are more durable and perform better in wet conditions but can be noisier.
- Riding Conditions: Consider your typical riding conditions. If you ride in wet or muddy conditions, choose brake pads that are designed for wet weather performance.
- Compatibility: Check the manufacturer’s specifications to ensure the brake pads are compatible with your brake calipers or brake shoes.
Troubleshooting Common Issues
Here are some common issues you may encounter when changing brake pads and how to troubleshoot them:
- Squealing Brakes: Squealing brakes can be caused by contaminated brake pads or rotors, misaligned brake pads, or worn brake pads. Clean the brake pads and rotors with brake cleaner. Ensure the brake pads are properly aligned with the braking surface. If the squealing persists, replace the brake pads.
- Brake Rub: Brake rub occurs when the brake pads are constantly rubbing against the rotor or rim. This can be caused by misaligned brake calipers or brake pads, a bent rotor, or a warped rim. Adjust the brake caliper or brake pads to eliminate the rub. If the rotor is bent, straighten it with a rotor truing tool. If the rim is warped, have it trued by a professional.
- Poor Braking Performance: Poor braking performance can be caused by worn brake pads, contaminated brake pads or rotors, or air in the brake lines (for hydraulic disc brakes). Replace the brake pads if they are worn. Clean the brake pads and rotors with brake cleaner. Bleed the brake lines to remove any air.
Maintaining Your Brakes
Proper brake maintenance is essential for safety and performance. Here are some tips:
- Regular Inspections: Regularly inspect your brake pads, rotors, and brake cables for wear and damage.
- Cleaning: Clean your brake pads and rotors regularly with brake cleaner to remove dirt, grease, and brake dust.
- Cable Maintenance: Lubricate your brake cables regularly to ensure smooth operation.
- Brake Bleeding: Bleed your hydraulic disc brakes periodically to remove any air from the brake lines.
- Professional Service: Have your brakes serviced by a professional mechanic if you are not comfortable performing maintenance yourself.
Conclusion
Knowing how to change bike brake pads is a valuable skill for any cyclist. By following this comprehensive guide, you can ensure your brakes are functioning properly and safely. Remember to inspect your brakes regularly, choose the right brake pads, and perform routine maintenance to keep your bike in top condition. With proper care, your brakes will provide reliable stopping power for years to come. Don’t underestimate the importance of knowing how to change bike brake pads; it’s a cornerstone of responsible bike ownership and safe riding. Understanding how to change bike brake pads empowers you to maintain your bicycle and ensure your safety on every ride. When you change bike brake pads yourself, you gain a deeper understanding of your bike’s mechanics. The ability to change bike brake pads contributes to your overall cycling confidence. Learning how to change bike brake pads also saves you money on bike shop service fees. Furthermore, knowing how to change bike brake pads allows you to address brake issues promptly, preventing further damage. Always remember that safety is paramount, and knowing how to change bike brake pads is an essential aspect of responsible cycling.
